Friday, 30 November 2012

Water Filler

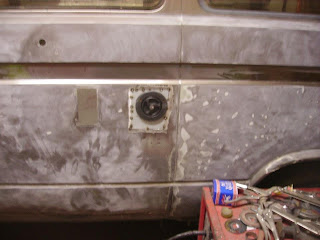
While flatting back the nearside and prepping ready for painting. The water filler point and electric socket are removed.


This is the hole for the water filler, as you can see it isn't the nicest. You can see the rot
 
 
All the rot has now been cut away ready for a new piece
 
 
New one made up and tacked in place

 
Trial fitting of the actual filler. Hole was a good size and a snug fit

 
Water filler repaired, dressed and filler cap temporary fixed it. All ready for spraying


Top Cap

 
Time to tackle the top cap, this has always been painted black but should be Bronze Beige Metallic so it's needs to be prepped for painting
 
All the cargo fixing points need removing

 
All removed

 
Pop rivets with washers on to spread the load when being strapped up
 
 
It took Jim, our restoration guru, about 3 hours to get the majority of the black stripped and rubbed down


I know he isn't looking forward to stripping the pop top 


All cleaned up


Monday, 26 November 2012

1/4 Panel Replacement

This is the 1/4 panel that is being replaced behind the sliding door. After the filler was removed previously a few rot spots appeared just behind the 1/4 panel. These need to be repaired before the new panel goes on.
 
 
As you can see the hole that needs reairing
 
 
And repaired
 
 
1/4 panel trial fitted first time round. It was a little long so the rearmost edge needed shrinking a bit to take up the excess. Jim tried the slider on for a test and it didn't really sit quite square

 
The inner of the new panel gets cleaned to bare steel then a healthy dose of weld through primer to protect it

 
The reason the slider doesn't fit straight. The main roller has at some point split and somebody has bodged it so it works but not right. 27 years of history

 
1/4 panel fitted and looking good. Just finish the inner arch repairs now


Lower Front panel

Jim, our restoration guru, noticed a couple of areas of bubbling paint which on closer inspection showed some rot. This is the front left hand lower area, this is where the front deformation panel meets the body. The rot is on the body and it has spread behind the deformation panel so he had to cut them off and remake.


Like so
 
 
Another small repair to the rear, a common rot spot as the A post is right next to the bodywork and it seamsealed so as soon as it cracks moisture seeps in and this is what happens
 
 
Rot cut out, post cleaned and treated as required then sprayed with a zinc rich primer for protection


And on the other side its just the same


The rusty area is the A post, the extent is quite clear, again all cleaned, treated and zinc primed

 
New area all welded

Sunday, 25 November 2012

Rear Arch

This is the rear arch behind the sliding door, this is having a new panel fitted but on closer inspection this was found. It looks like Tessie is throwing us another curve ball


This is inside where the water has sat. Its rusty but solid
 
 
On closer inspection this is what is found. Looks like a new arch/repair is needed
 
 
Arch rust but check out the bit of yellow, has this something to do with rust?

 
Rockwool is known to soak up water and hold it. This may not have helped the rust

 
Rotten edges cut out

 
More cut out

 
Arch removed

 
New rear arch


Accident Repair

Before we got Tessie, when she still lived with the nice couple from Macclesfield, she was involved in an accident.  He pulled out of a junction, in front of a car, and was hit in the side on the panel behind the sliding door. This went through the insurance and a "professional" repair was done so all the paperwork says.


Previous repair but not with filler here but body solder (lead)


The white dust is filler from the repair but panel is nowhere near straight

 
Paint being keyed for spraying. Still a bit snowy
 
 
Tessie

Quite a lot of filler though!!!


Remains Found !!!!

Whilst removing the fibreglass top cover to prepare the roof for painting small bones were found. This was probably a small mouse or maybe a bird but had been there for a long while.

 
Lots of muck from underneath the top cap. Not surprising as it has been fitted for 27 years

 
Remains unidentifiable!!!


Rust bubbles but overall a solid roof


Tessie with grills and top cap removed. How sad does she look?

Crusty Bumper

Lets go back to the "Crusty Bumper" I mentioned earlier and investigate that a little more, as we already know Tessie likes to throw us a curve ball every so often just to keep us on our toes.

 
The lower grill panel was held on by a rawl plug so we were lucky to still have this!!

 
I think this is rotten and have to be replaced. Lucky Jim is good with a welder as we aren't using filler on Tessie at all

 
Lower front panel to be repaired

 
Lower piece of lower panel has been sandblasted and coated with rust killer

 
Drilling out spot welds

 
Majority removed just lower strip to come off

 
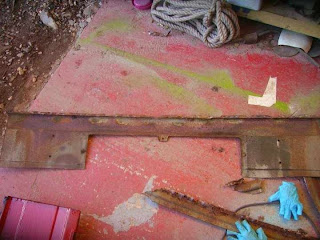
Inside ofold panel. As you can see VW didn't protect them from rusting

 
New panel has a good coat of red oxide applied to protect it


All fully welded


Testing the fit with the grills in and weld primer applied to stop the welds rusting the seams from the inside

 
Lights and grills fitted for safe keeping